Showing posts with label fun stuff. Show all posts

Tuesday, January 7, 2014

How to Make CrockPot Crayons


Day 176.

What's the best thing to do with old, broken crayons? Recycle them! This is a great rainy (or overly hot) day project, that is both fun and useful.


The Ingredients. --old crayons

--muffin tin or candy mold. I was ecstatic to find a 6-hole, throw-away muffin tin at the grocery store. I really want to try and make cupcakes. In order for it to fit in my 6qt oval Smart-Pot, I needed to trim the edge a little with some scissors, but afterward I did that, it fit nicely into the crockpot. My friends have candy molds that fit in their crock perfectly, and next time I'm at the craft store I'm going to look for them.

--kid helpers.

The Directions.

Sort the crayons into color families, and peel the wrappers off. It helps to soak the crayons in some warm water before peeling.

Break the crayons into small pieces, and load into the candy mold or muffin tin. It's best to mound the crayons up a bit; they will melt and shrink down.


Put the tin or mold into the crock, cover, and turn on. We cooked our crayons on high for 1.5 hours.

Once the crayons have melted completely, your crayons are done.
Let the hot wax sit in the crock and begin to harden before trying to remove the pan--- you don't want hot crayon wax spilled, or to get burnt.

Refrigerate the pan for 30 minutes, or until the crayons have hardened completely and pull away from the edges.
Pop out and enjoy!

The Verdict.

This was a fun project to do. We were surprised at how easy some crayons peeled, and how others needed to soak for quite a while to loosen the wrapper. We also noticed that crayola crayons sunk, while the generic crayons floated. The same thing happened in the melting process---the generic wax floated to the top, and the deep crayola color sunk to the bottom---which meant that in order to get a nice color, the kids need to use the bottom of the crayon. I will make these again. They were easy and the kids had a ball.

Monday, December 30, 2013

The CrockPot as a Foot Bath


Day 217.

I ran a half-marathon yesterday. 13.1 miles. All by myself. Well, myself and 20 thousand people.

I had a huge writing project due June 1, and instead of being happy that it was done and over with, I found myself in a funk. I didn't have anything to work towards, and was feeling antsy. Our friends Carol and Joey are long-distance runners, and they were going to run the San Francisco marathon---Carol the half, and Joey the full. Adam signed up--and without thinking twice I told him to sign me up too.

Except for that I have never really run. And Adam has. Lots.

and lots.

Being a die-hard optimist, I figured I could do it.

So I did.

We met Regan for a pasta feed and I got a good night's sleep and powered through.

I'm pretty sure that they were picking up the cones right behind me and sweeping up the Cytomax dixie cups, but I still did it.

And I'm so very glad it's over.

The Ingredients.

--a finished long run
--bubble bath (and yes, Disney Vapor Bath is the only bubble bath in our house...)
--towel
--margarita

The Directions.

Make margarita.
Fill crockpot with nice warm water from the tap and some bubble bath.
Agitate water with your hand to make bubbles.
Convince the kids that this is for mommy and mommy only, and to go play outside. Or in the garage. Or in the playroom. Just stay away from mommy.
Plug in crockpot with an extension cord right in front of the TV.
Turn to warm.
Sit.
Soak.
Drink margarita.

The Verdict.

Adam: Hey Steph? Did you only run a half-marathon so you could soak your feet in a crockpot and post it on the Internet?

Steph: Yes. I absolutely did.


~~~~~~~~~~~~~~~~~~~~~~~~~~~~~~~~~~~~~~~~
DISCLAIMER: psst. don't do this. you could get burnt. or electrocuted. or something really bad.
don't do this.
please.
that is all.

Monday, December 23, 2013

Brownie In A Mug CrockPot Recipe


Day 248.

It's like it's hot chocolate... but it's a brownie! in a mug! baked in your crockpot!

Melba emailed me yesterday with a brownie-in-a-mug recipe, and I knew the second that I opened the email, I was going to have to make it. Right then and there.

But in the crockpot.

The Ingredients.

--mugs. I fit 4 mugs inside of a 6 quart crockpot. Don't pick fancy-schmancy mugs--use the ones that you don't think twice about throwing in the dishwasher or heating up in the microwave.
--your favorite brownie mix
--the stuff your favorite brownie mix tells you to use

The Directions.

Mix up the brownie mix according to the directions listed on the package. I used the new gluten-free brownie mix from Trader Joe's.

(psst. I did NOT spray the mugs first with cooking spray. You might want to. They're kind of a pain to clean.)

Spoon brownie mix into each mug, filling it about 1/2 to 2/3 of the way. The brownie mix I used only makes an 8 x 8 pan, so each of my mugs were 1/2 filled.

Put the mugs in the crockpot.

Cover and cook on high for 1 1/2 to 3 hours.

Our brownies were finished at 2 hours, 15 minutes (see note down below). You will know they are fully cooked when they have risen, pulled away at the sides and you can insert a knife and pull it back out clean.

Unplug the crockpot, and let the mugs sit with the lid off. They will be TERRIBLY HOT. Don't get burnt. Leave them alone for a bit before removing.

When the mug is coolish to the touch, top with whipped cream or vanilla ice cream.

The Verdict.

Perfect! A wonderful, fun dessert that we all enjoyed, and that will evoke fun memories for the kids. We had a ball sitting on a blanket in front of the TV eating our "hot chocolate."

This was a really fun idea, and something I will do quite often, now that Melba gave me the heads up!

~~~~~~~~~~~~~~~~~
added 9/5/08 2:08 a.m because I totally have insomnia after eating so much chocolate...
GO see Amie's hysterical video about making brownies in a crockpot. It will complete you.
Life with the Boys CrockPot Brownie Video. Amie used Duncan Hines Brownie Mix---it is thinner and it makes more than the batter I made up with the TJ's GF mix; therefore the longer cooking time.

Sunday, December 22, 2013

You Can Make Shrinky Dinks in the CrockPot!


Day 257.

Oh this is so much fun. Anne emailed me last week to share that her Sunday School class has used Crock-Pots to cook Shrinky Dinks. The last time I made Shrinky Dinks, I was in second grade. I now own a second grader. This realization was rather startling.

The Ingredients.

--box of Shrinky Dinks---found readily in most craft and drug stores. I found ours at Walgreens while I was buying yummy-scented candles. Because they make me happy.
--colored pencils (the box comes with some, but we liked ours better)
--scissors
--kids
--CrockPot

The Directions.

I plugged the crockpot(s)---I ended up plugging in 3 because we made so many---on the counter to preheat on high and we got to work coloring and cutting the plastic. The plastic can be sharp; I'd recommend an adult do the cutting.

Put the cut out plastic shape into the crockpot. If the crockpot is fully hot, it will begin to shrink right in front of you---it will curl, fold up a bit and create either jubilance or tears.
But then it flattens and is fine, and tears will turn to glee.

Remove the little piece of shrunken plastic with a spoon or spatula. If it hasn't fully shrunk, the piece will stick a bit to the bottom of the crock. This alarmed me, and I pushed it around a bit with the spoon, but I think that wasn't necessary. They seem to unstick on their own when the shrinking process is complete--the longest piece took about 10 minutes. If the crockpot isn't fully heated, it will take longer.

The Verdict.

I can't remember the last time the girls and I had so much fun working together on a project. This craft is a great age-equalizer. Both my almost 4 and almost 7 year old could work side-by-side without competition or any worry about "doing it right"----I colored a few, too, and it was a lovely afternoon. I will definitely make these again.

I liked the crockpot rather than the oven, because the kids could sit on the counter and watch them shrivel, and I could poke at them with a spoon (probably not necessary, but it made me happy). I didn't use the crockpot cover, and we all peered in without fear of great bodily harm.

A-plus craft. Thank you SO much, Anne!

Sunday, December 8, 2013

How to Make Candles in the CrockPot


Day 323.

Don't look now, but the gift-giving Holidays are just around the corner.

But it's okay, because you can make candles.
Cheaply (or for free!) with your crockpot.

I love candles, especially inexpensive ones, and scented with food: vanilla, cookie dough, pumpkin pie, apple cinnamon, coffee, and gingerbread. I am the happiest after lighting a yummy-scented candle.

For a while, I was getting up at 4am, and drank coffee in the dark with a few lit candles before beginning the day. It was quite peaceful.


Because of this love, I have quite a few candles that don't light anymore, but the jar/glass container still has trapped wax.


Yesterday, I took the wax out of 9 of these candles, and made 3 new ones. Al Gore would be so proud of me.


I also used some soy wax that I got at Michael's to make 3 others. It was a fun project, and now that I know how, one I will do quite often.

The Ingredients. --old candles in glass containers
(or empty glass containers and wax suitable for candle-making from the craft store)
--3 inch wicks (this size works well for the tiny candles sold at the dollar store, the Glade candles, etc.)
--candle fragrance, essential oil, or cooking extract
--candle coloring dye (not food coloring, sigh.)

The Directions.

Freeze the jars with the leftover trapped candle wax. Use a steak knife to pop the wax out of
the jar/glass container. If your container is tapered, you'll need to chop the wax up with the knife before it can fall out.

Cut away the old wick and discard. Chop the wax into small pieces--about 1/2 inch square or thereabouts.


Wash the containers well in soapy water and dry completely.

Fill each glass with the chopped up wax. I put the wick in, but you don't need to until the wax has melted. If you are going to use soy wax, or another store-bought wax, fill the glass container the same way.

Nestle the containers into your crockpot. I got 6 to fit nicely in a 6.5 quart oval.

Cover and cook on high for 2 hours, checking every 30 minutes.

When the wax is completely liquidy, add your color and scent. Food coloring doesn't work. I tried it. Mix with a wooden skewer, and lower in the wicks.

Unplug the crockpot. Let the candles sit in the cooling crockpot for about 4 hours, or until they have set enough to move.

Do not use for 12 hours.


Light and enjoy.

The Verdict.


I wish I could say that this was a fun project I did with the kids, but I'd be lying. One was at school, and the other was in the backyard. She poked her head in a few times but I shooed her back out. This was
my art project. I'm looking forward to trying this again, and getting some of the different colors and scents they have at the craft store. The peppermint extract worked, but I think I'll use an essential oil next time for a more pronounced scent. I'm very pleased with the results--even the splotchy ones made with food coloring.

updated: anon just reminded me about crayons! I agree that they might work quite well to create a color. I learned from the crayons-in-the-crock experiment that Crayola melt the nicest.

Friday, December 6, 2013

The CrockPot as an Air Freshener/ Odor Neutralizer


Day 333.

Happy Black Friday! I hope each of you had as wonderful of a Thanksgiving as I did. It was also terribly easy---we had 6 crockpot dishes and a turkey-in-the-oven. Lots of food, and a super-easy clean-up.

But.

At about 10pm last night, the house was cleared, and I noticed a funk. It wasn't bad, but it was a slightly sour smell of old mulled wine, and dirty dishes. Instead of actually cleaning the dishes and emptying the wine crockpot, I eliminated the odor.

With the Little Dipper!

The Ingredients.

--water
--baking soda (for the little dipper, I used 3 T)
--crockpot

The Directions.

Pour water into the crockpot you are going to use. Add baking soda. Mix. Plug it in and turn to low (the Little Dipper and some of the small ones don't have settings, they just plug in). Keep the lid off.

Let the baking soda do the job of soaking up unpleasant odors.

If you would prefer to use the crockpot as an air freshener, fill with water, and add:

--drops of essential oil
--potpourri scent
--2 teaspoons of vanilla or other desired extract
--ground cinnamon, and cloves
--a cinnamon stick
--slices of lemon

The Verdict.

I was quite pleased with how the baking soda really did absorb the kitchen odors. I took the mini crock into another room later and smelled the water----it smelled strongly of mulled wine.
woah.

Thursday, December 5, 2013

How to Make Soap In Your CrockPot


Day 336.

Soap! In the crockpot! woo-hoo!

The kids and I made soap yesterday with some glycerin soap-making stuff I bought at Michael's. I didn't have anything on hand, so ended up buying a 4-in-1 mold, fragrance, color, and the glycerin cubes.

I spent $25.21, and we ended up with 12 bars of soap. I have enough of the color and scent to last for quite a while, and the mold will supposedly last forever. Each new set of glycerin cubes costs $9.99.

We really enjoyed making this soap. The kids had fun picking out the colors, and are excited to use their creations. I pushed a holiday-themed foam sticker (minus the backing) into the soap while it was setting for some extra oomph.

The Ingredients.

--glycerin blocks (I used Life of the Party brand)
--fragrance (I did try peppermint extract and almond extract also, and so far they have a scent)
--coloring
--soap mold (I think silicone cupcake holders will work well, too)
--crockpot
--oven-safe dish(es) to put in the crockpot (ramekins)
--a few wooden skewers for stirring

The Directions.

Do not put the soap mold into your crockpot and add the glycerin cubes, and turn it on. The mold will melt. And you will be annoyed when your husband says something along the lines of "I thought that might happen."

What you should do instead is put an oven-safe dish (or 2) into your crockpot and add the blocks. You're going to have to use a big knife to separate the blocks.

Cover and cook on high for about an hour, or until the glycerin is all liquidy.

Using oven mitts (trust me), carefully pour the liquid glycerin into each mold. Add fragrance and color. A bit of fragrance goes a long way, but you do need quite a few drops of color. Stir with a skewer.

After the top of the soap starts to set, you can insert the foamie or other object into the soap. The foamie floats, so I held it in place with the skewer a minute or so until the soap set around it.

Let the soap cure for about an hour before removing from the form. If you wait until it's fully cool, it pops out of the mold MUCH easier than if you try to rush it (trust me again on this one).

Repeat steps until you run out of glycerin.

The Verdict.

I had more fun making these than I thought I would, and now that I know the steps, I'm excited to try again. I'd like to pick up some silicone molds after the holidays when they are deeply discounted and try to make larger soaps in fun shapes.

The kids are quite impressed by me. It only took 336 days.

updated 12/06: Glycerin soap sweats. It surprised me, but evidently this is normal. Wrap your homemade soap in cellophane bags for gift-giving, not tissue paper. :-)

Wednesday, December 4, 2013

CrockPot Christmas Ornaments


Day 345.

Katy emailed me yesterday and I saw on her blog how she made the most adorable ornaments for her Christmas tree. The kids and I got to work at once making some salt dough. Ours weren't as cute, but we had a bunch of fun rolling out the dough while singing (loudly!) to carols playing on the satellite TV channel.

The Ingredients.

1 cup salt
3 cups flour (I used Pamela's because that's the only stuff I had in the house. Inexpensive rice flour would be the best bet for those who can't handle wheat)
1 cup luke warm water
1 T vegetable oil

The Directions.

Mix dough with hand or stand mixer until it reaches a ball. If needed, add 1 tablespoon more water while mixing. The dough will be sticky, but will hold shape when molded.

Make ornaments (or beads for stringing). We made a bunch of beads to create a garland, and a few cut-out shapes for regular ornaments with playdough cookie cutters. Use a chopstick to make a hole in the center of the ornaments--you need to have a good amount of dough surrounding the hole so it doesn't crumble when hung.

Line the bottom of your crockpot with parchment paper. I did not do this, and it was a bad idea. Place dough creations into the bottom of your crockpot. I used both of my 6 quart crockpots for this project. Cover and cook on high for 2-3 hours, flipping once.

The ornaments are done when they are hard to the touch and have browned slightly. I did overcook a few, but after a coat of paint you can't tell.

After they have cooled completely, paint. We only had crayola poster paint in the house, so that's what we used. A paint that dries with a shiny coat would look better. Seal with a varnish or Mod Podge. I haven't done this yet, but I'll get some Mod Podge next time I'm at Michael's.


The Verdict.

These were a lot of fun for us. My four-year-old kept eating the dough which was a little weird, but we were all in a good mood, and made memories. I like salt dough a lot, and have used it to make hand and foot prints. I liked using the crockpot instead of the oven this year because we ended up with NO casualties---none of the pieces cracked, and the slow cooking meant I could fuss around with the pieces and move them around to ensure an even bake. I have a half-batch of the dough left wrapped up in the fridge, so this weekend we'll get some nicer paint and make some more ornaments to give as gifts.

If you're looking for dinner for tonight, my crockpot lasagna recipe and brie with cranberries and candied pecans is up today at Wasabimon.

more fun stuff:
playdough
crayons
candles
shrinky dinks
soap
brownies-in-a-mug

Tuesday, November 19, 2013

Frequently Asked "A Year of Slow Cooking" Questions, Part II


I've gotten a slew of related questions the past few months, and while I absolutely LOVE answering questions (I really do, don't read this with sarcasm. The idea of actually helping real, breathing people in any way I can is exhilarating---please don't ever feel like you're bugging me with any of your questions. I promise if you're asking, somebody else already has. :-) ) I figured it might be helpful to round up some of the recent most frequently asked. 

Part I of Frequently Asked A Year of Slow Cooking Questions is located here.
and see: Slow Cooker Troubleshooting


1) How do you keep your slow cookers clean? 

I use Adam. HA! No, really, Adam is pretty much the slow cooker washer guy. He's an expert you know, one of his first jobs was washing dishes in the kitchen at the local hospital.

For the most part, I'd suggest emptying the stoneware as soon as you can. If you have leftover food, scrape it into a tupperware or some other sort of storage container. This isn't mandatory, you can certainly store the food safely in the fridge in the stoneware, but it is NOT recommended to reheat in the stoneware in the crock for leftovers, so you might as well clean it out on day 1.

If you have baked on gook, the absolute best way to get it off without ruining your manicure (HA! on the manicure. Although you can get a pretty nice pedicure...) is to fill the stoneware insert with hot water and add a tablespoon of dishwasher powder. 
Then float a fabric (dryer) softener sheet in the water and let it soak overnight. Then wash in the dishwasher, or by hand in the morning as usual. If you do not have the dryer sheets, a gollop of liquid fabric softener will do the trick, too.
DO NOT ever put a hot stoneware into your sink and fill it with cold water. It will crack. And then you'll be super sad.


As for the slow cooker base with the heating element, do NOT fill it with water, ever. Make sure to read the pamphlet that comes with your particular slow cooker for the manufacturer's suggested cleaning technique, but what I do is use a very slightly damp paper towel to wipe out any dribbles or a clorox wipe (I puffy heart love clorox wipes).


2) What's the difference between a Crock-Pot and a Slow Cooker? 
Nothing. Crock-Pot is a brand name of the first type of slow cooker, formally under the Rival label. There actually isn't such thing as a "crockpot"----although many people do call their slow cooker a "crockpot." There are many manufacturers of slow cookers on the market. These are the ones that I happen to use in my own home kitchen. 


3) What size slow cooker should I buy? 

It depends on what you are interested in cooking, and your family size. Slow cookers work the best when they are 2/3 to 3/4 of the way full. The recipe times are for this amount of food---if your pot isn't full enough, the food will cook faster and might burn. If it's a bit too full, your food will take longer to cook than the suggested cooking times.

Before my year-long challenge, I had 2 slow cookers that I used for everything: a 5.5-quart Smart Pot and a 1.5 quart mini crock I got at a Black Friday sale at Walmart for $4.95 (score!) These pots served my family of 4 quite well until I started this challenge.

I then upgraded to a 6.5 quart eLume (I was given it from Crock-Pot), and that is now my new go-to. I also like the Hamilton Beach Set and Forget, especially the locking lid---it's fantastic for potlucks and travel. These are the slow cookers and accessories (hand mixer, pyrex/corningware inserts I happen to use in my own home kitchen.


For a family of 2-3, buy a 2-4-quart
For a family of 3-5, a 5-6-quart
For a large family, or for entertaining groups of people, opt for a 7-8 quart slow cooker
I adore my Little Dipper, and use it quite often for dips, fondues, and even as an air freshener!


4) What if I only have a huge slow cooker? Can I still make recipes that call for a smaller size? 
Yes. It's super easy. Simply insert an oven-safe dish (Pyrex, Corningware, etc.) into your large stoneware, and load the ingredients into the dish. 
This will create a smaller cooking vessel inside of your slow cooker. Then cover and cook like normal. It will take a bit longer for the dish inside to get up to temperature, but your food will cook just fine.
If you are cooking a dish (chicken, for instance, which has the tendency to dry out) and the recipes calls for a 4 quart, but you only have a 6 quart (this is an example...) put the ingredients into your slow cooker, then put a layer of foil or parchment paper down near the food to help trap in the steam and moisture near the food. Then cover and cook like normal. This is also a big help if your slow cooker has one of those super helpful (now this is sarcasm..) "vent" holes in the lid or in the side of the stoneware insert. 

PLEASE BE CAREFUL when removing the foil or parchment paper at the end of the cooking time. The steam will be quite hot and will shoot out. Keep small children far away.


5) Are all of your recipes gluten free? What about the ones in the book? 
Yes. We happen to be a gluten free family, because my 4 year old has been diagnosed with Celiac, which is an intolerance to gluten (found in wheat, barley, and rye). The book is completely gluten-free, and all the recipes on this site have been made gluten-free. PLEASE! read all labels carefully on your own, because manufacturers are known to sometimes change ingredients with little-to-no warning.

If you are not gluten-free, simply ignore my notes and use the ingredients you normally would use when cooking for your family.

Want more info on going gluten free? I wrote about our journey a bit, here, and there are links at the bottom that will be helpful.


6) Do you peek while slow cooking?
Yes. I am not the best at following rules, and I often taste, stir, and poke at my food while it's in the slow cooker. I've heard from reliable sources that you can lose up to 20 minutes of valuable cooking time each time you peek, but I have not noticed that to be the case. Peeking and tasting makes me feel like I'm doing something, and it makes me happy. I like being happy.

That said, if you are baking with your slow cooker, or are making a layered casserole such as lasagna or tamale pie, try not to peek until the very end of the cooking time, so moisture doesn't escape. And DO NOT peek on the yogurt recipe---keep the valuable heat inside.


7) How come you aren't posting every day anymore? 
Because my year-long challenge is over! I'm currently slow-cooking baby number three, and am working on some other freelancing commitments, along with trying my hardest to give my children more of me than they got last year. I am still completely infatuated with my slow cookers and use them VERY regularly. I'd be absolutely lost without them.

8) Have you seen Julie & Julia? Not yet! It looks like a group of my friends will go together next week. I can't wait.


I hope this helps, some! If you have other questions, let me have 'em in the comment section. xoxo steph


related topics:
Frequently Asked A Year of Slow Cooking Questions, Part 1
Slow Cooker Troubleshooting
My New Year's Resolution
Alphabetical Recipe List
Holiday Recipe List
Help! My Slow Cooker Cooks Too Fast!

Monday, November 18, 2013

Good Morning America, and Other Announcements


1.) The book is completely and totally and officially all done. It will be in stores this coming Tuesday, October 13. If you have pre-ordered from Amazon (and THANK YOU!!! for the pre-orders!) your book will be mailed that day.

2.) I am going to New York, and will be on Good Morning America on Tuesday, October 13. Set your DVRs, email your grandma, and tweet your peeps. I'm trying my hardest to not have an anxiety attack while on camera.

or on the plane.

My mom took me shopping for nice maternity clothes which actually fit, so I'm hoping I look pregnant and not just like a huge swollen blob.

3.) I got my hair done today. It's a bit darker than I've had in quite some time, and I really like it. The kids are weirded out. Adam likes it, but he says that no matter what. I'm quite pleased-- I think it looks fallish.

4.) You may have noticed my new super-awesome header with clickable tabs, thanks to the lovely and talented Jennette Fulda, of Make My Blog Pretty. If you are ever in need of any site design, tweaking, or hand-holding, Jennette is your girl. I can not possibly express how wonderful and responsive she is.
She is also the author of Half Assed, a hysterical weight-loss memoir I read on the plane the last time I went to New York. I was so thankful to have her book to keep my mind off of the turbulence.

I hate turbulence.

eek. Now I've freaked myself out again.

5.) I've gotten a few emails about an icky ad for cutting out belly fat that has been automatically attaching itself to the bottom of the emails that go out through feedburner. I had NO IDEA this was happening, and greatly appreciate the head's up. I've since contacted google and have asked to be opted out of certain campaigns, but it looks like it takes about 24 hours to process these types of requests.

I'm terribly sorry that this happened, and I hate it that anyone has been inadvertently offended.

6.) The $200 gift card give-away is still going strong over at Totally Together Reviews. If you haven't already entered, hop to it!

7.) I am ecstatic that the book is finally here. I've heard several authors liken writing and publishing a book to child birth. I have even joked with friends that sometimes it feels that way. But I've decided it's not the same. It's not even close.

At the end of the day, the only thing that matters is family. So. Hug your kids, call your parents, your grandparents, your sister, and your brother, and remember that all the day-to-day stuff doesn't matter. Family comes first.

and then go set your DVRs. ;-)

xoxo steph

Slow Cooker Witch's Brew Recipe


Happy almost-Halloween! We had a play date today, and my 5-year-old taste-testers couldn't get enough of this stuff. The comments I overheard were priceless:

"it doesn't taste like there are spiders or lizards or bugs in it"
"how did your mom even know how to make this?"
"is my tongue green yet?"
"I've never had ice cream in a drink before"
"I guess this is why witches have green faces"

This is a super easy hot beverage to whip up, and tastes like a lovely citrus cocktail. I'm sure you could put a shot or two of something in there if you are planning on serving adults.

The Ingredients.
serves 8-10


2 quarts apple juice
2 quarts pineapple juice (or thereabouts. the canned holds 1 quart, 14 oz)
1/4 teaspoon allspice
1 box (6 ounces) lime jello powder
5-6 whole star anise *
orange sherbert (to add before serving)

* I wouldn't go out of my way to purchase star anise if you don't already have it in the house. It looks neat floating in the pot (like little spiders), and provides a touch of a licorice taste, but not enough to justify the expense. If you really want a tad bit of licorice flavor, throw in a few jelly beans and call it a day.

The Directions.

You will need a 5.5 quart or larger slow cooker. If you only have a smaller one in the house, you'll need to cut down the juice quantities.

Pour in the juices, and add the allspice. Stir in the jello powder, and float the star anise (if using) on top. Cover and cook on low for about 5 hours, or on high for about 3. Serve with a scoop of orange sherbert---it will cool the beverage down enough for small children to enjoy right away, and creates a fun foamy slimy film---perfect for Halloween.

The Verdict.

Delicious. It's quite limey in flavor, and a really fun color. I debated whether or not to thrown in a handful of grapes to mimic eyeballs, and am glad I decided not to. I think the possible choking hazard thing would worry me too much. My little friends were thrilled with their after-school snack (I promise I fed them lunch before filling them up with sugar!) and I received many sticky hugs and thank yous.

I also taught them my favorite joke of all time:

What's Ernie's favorite ice cream?

SureBert!

hahahahahahaa

P.S. don't look now, but the Holidays are right around the corner. They really, and truly are. Here's a round-up I did on Totally Together for Holiday Gifts that Support Bloggers.

also, if you have not yet entered the $200 gift card giveaway, it's still going strong over on my Review Blog.

Have a fantastic Halloween. Be safe!

Sunday, November 17, 2013

Drop In and Decorate---Cookies for Donation

I first heard of this fantastic organization about a year ago. I was smack dab in the end-of-the-year craziness in the slow cooking challenge, and instead of jumping in to help, I merely bookmarked the website.

This year is different. This year I look forward to making a bunch of plain cookies, and working with our Girl Scout Troop to decorate them for a good cause. I used to run a child care center that served homeless families, and I'm looking forward to bundling our cookies up to bring to some very deserving children and families.

There are very few rules, which is why I really, really like this project. You don't need to bake (unless you want to). You don't need to make your own icing (unless you want to). All you need is a few of your favorite friends, and an open and giving heart.

My friend, Lydia, started Drop in and Decorate in 2007. It has grown phenomenally. Here's a bit of background on this not-for-profit organization:Collapse

Drop In & Decorate is a tax-exempt nonprofit organization.
Founded by food writer Lydia Walshin of The Perfect Pantry. The idea behind Drop In & Decorate is simple: bake some cookies; gather a group of family, friends, neighbors, co-workers, your worship group or book group to decorate the cookies together; donate the cookies to a nonprofit agency serving basic human needs in your own community.
It’s a simple idea in a complicated world, and something anyone can do.
If you’d like to host your own Drop In & Decorate® event, Pillsbury and Wilton would like to help.
Pillsbury has donated 50 VIP coupons, worth $3.00 each, off any Pillsbury product -- including sugar cookie mix and icing -- to be distributed, first come, first served, while supply lasts, to anyone who plans to host a Drop In & Decorate event (max. 5 coupons per person). And we'll include a Comfort Grip cookie cutter, donated by Wilton, to people who plan to host cookies-for-donation events.
Write to lydia AT ninecooks DOT com for more info on how to get your free coupons and cookie cutters.

My girls are quite excited to participate in this event. While I type this, they're looking over my shoulder and would like to do it twice---once with the girl scouts, and again with friends and family.

Thank you to Lydia for this fantastic way to give back to the local community, and for providing a beautiful opportunity to make a difference while creating family memories.

PS. Today (November 15) at 5pm pacific, the $200 Best Buy Gift Card give-away over on my review blog will finally end. It's your last chance to throw your name in the pot.

xoxo steph

Saturday, November 16, 2013

More Give-Aways! The Tassimo Hot Beverage System and the Gluten-Free Almond Flour Cookbook

Good morning!

When I said I had more stuff to give away, I wasn't kidding.

I'm happy to share that I have two new review posts over at Totally Together Reviews.

The first is for a Tassimo Hot Beverage System---you can make a perfect coffee house drink in the comfort of your home or office whenever you'd like.

and what do you need with coffee?

pastries!

I have never tasted better pastries than those made with almond flour. I have 2 copies of Elana Amsterdam's The Gluten-Free Almond Flour Cookbook to give away over at Totally Together Reviews.


It's not too late for last-minute shopping or gift-making, either. How about:

Holiday Gifts to Support Bloggers
Roasted and Spiced Nuts
Peanut Clusters
Peanut (not brittle) Candy
Glycerin Soap
Recycled Candles
Salt Dough Ornaments
Apple Butter
Shrinky Dink Crafts
Playdough (fun gift for small kids---wrap in a cellophane bag, and tie on a cookie cutter)

have fun, good luck, and thank you for entering the contests! (not here---you need to click over to Totally Together Reviews. Comments left here are NOT counted.)

Monday, November 11, 2013

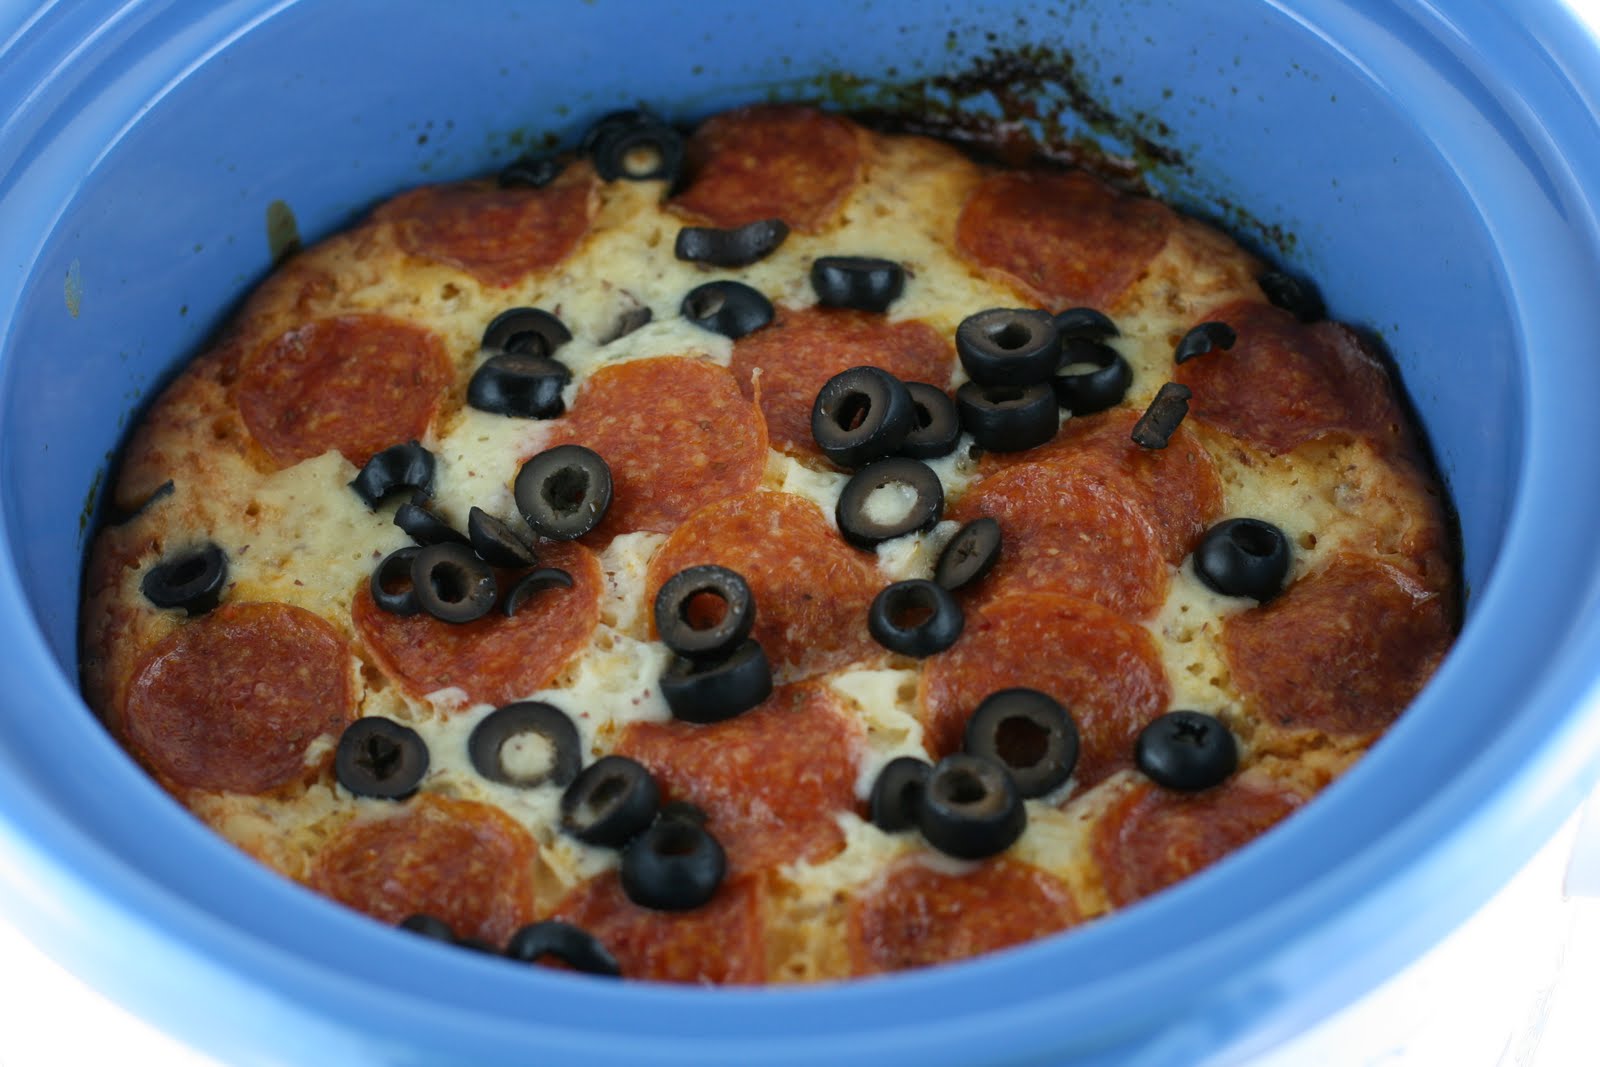
Slow Cooker Puffy Pizza Casserole Recipe

Hello all over again! I've got my coffee, and am beginning to feel somewhat-human again. I've been wandering the living room in a complete daze trying to process the past few days.

Thank you so much to everyone who took time out of their busy lives to come see me at the Food and Wine Festival. I had so much fun putting faces to email addresses and blogger handles.
I love how enormously huge and scary and yet how small and friendly the Internet can be all at the same time.

You are all wonderful, thank you.

Who's ready for pizza? While I was doing my year-long slow cooking challenge, I got a few cheeky comments from people who were certain that my family was missing out on eating pizza because I was preparing a slow cooker meal everyday. Since we're gluten free, we don't actually eat all that much pizza anymore anyway, but the comments still got my brain buzzing, and I wondered if I COULD make pizza in a crockpot.

I can now say: yup.

It's not the same, but it's close enough to a deep-dish style pizza to satisfy any and all pizza cravings, and it comes right out of your crockpot.

Life is good.

The Ingredients.
serves 8


1 pound lean ground beef
1 small onion, diced
1 garlic clove, minced
1 (1.5) ounce packet of spaghetti mix (if using store-bought, look out for hidden gluten. I like the McCormick brand. You can also make your own using the recipe below)
1/2 teaspoon oregano
1 (15-ounce) can tomato sauce
1/2 cup water

for puffy topping:

1 cup all-purpose flour (I use Pamela's Baking Mix as my AP flour)
1 cup milk
2 eggs
1 cup shredded mozzarella cheese
20 pepperoni slices
1/2 cup sliced olives, optional

Homemade Spaghetti Sauce Mix
yields 1 packet

1 1/2 teaspoons kosher salt
1 tablespoon cornstarch
1 tablespoon dried minced onion
1 tablespoon parsley flakes
1 teaspoon granulated white sugar
1/4 teaspoon garlic powder
2 teaspoons green pepper flakes
3/4 teaspoon Italian seasoning

The Directions.

Use a 4 quart slow cooker (if you only have a 6, that's okay, it will just cook faster. Check it after 3 hours on high.)

In a very large skillet, brown beef, onion, and garlic on the stove top. Drain fat, and add spaghetti sauce mix, oregano, tomato sauce, and water. Stir over low heat until tiny bubbles appear. Remove from heat and scoop into the slow cooker (you might want to spray it with cooking spray).

In a mixing bowl, combine the ingredients for your puffy topping: flour, milk, eggs, and cheese. Pour evenly over the top. Place pepperoni slices and olives on top of the topping.

Cover and cook on high for 4 hours, or until the topping has turned golden brown, puffed up, and pulled away from the sides.
I have not tried to cook this yet on low. I'd check it after 6 hours (in a 4-quart, 4 hours in a 6-quart).
If you do opt to cook it on low, I'd love to hear your timing results!

The Verdict.

I was given this recipe from a good friend of mine (who is rather shy and doesn't want her name on the internet!), and was so eager to give it a try. She usually cooks it in the oven, but said that sometimes it puffs over the side of her baking dish, and makes a huge mess in the bottom of her oven.

I loved the way it worked in the crock. I didn't vent the lid at all---it puffs up beautifully and completely satisfied my family's cravings without needing to worry about gluten or tipping the delivery guy!

more pizza stuff:
pizza soup
pizza fondue

go read about PowerAde Play! there's a chance for you to win $125!

Sunday, November 10, 2013

Slow Cooker Big Easy Meatloaf Recipe


It's the summer! And evidently that means that I neglect the computer.

oops! Sorry about that.

But I have been crockpotting, and I'd like to share a meatloaf I threw together that we enjoyed out in the yard.

I really appreciate that I can use the crockpot on a hot day and not have it heat up the house the way the oven or stove does. I also appreciate that the kids and I can be out in the yard playing in the water instead of hanging out in the house while I tend to dinner.

The Ingredients
serves 4-6

1 pound lean ground turkey or beef
1 small onion, chopped
2 fully cooked andouille sausage links (6-ounces, total)
1 teaspoon garlic powder
1/4 teaspoon paprika
1/4 teaspoon thyme
1/4 teaspoon cumin
1/2 teaspoon kosher salt
1/4 teaspoon pepper
1 egg, lightly beaten

The Directions

Use a 6-quart slow cooker. I put a metal loaf pan into the slow cooker and baked the meatloaf in it (no need to add water, just put the loaf pan into the crock), but if you'd prefer to not use a loaf pan, you can just make a blob with the meat and put it directly into the crock.

Anyhow, take the casing off of the sausage, and chop it into pieces. Toss it in a mixing bowl with the ground meat, all the spices and the beaten egg. Mix well; I always use my hands. Shove the meat mixture into a 9 x 5 x 3 baking pan and put this pan into an oval crockpot (or plop the meat blob into the crock all alone).

Cover, and cook on low for 6-8 hours, or on high for 3 to 5 hours. You'll know the loaf is done when it's brown on the top and it starts to pull away from the sides. If you're not using the loaf pan, the meat will cook faster---check after 4 hours on low, 2 to 3 on high.

When thoroughly cooked, turn off and unplug the cooker and let the meat sit for about 15 minutes before removing from the pot.

The Verdict

I loved how the andouille sausage livens up this meatloaf (which can sometimes be pretty darn boring). I also liked that I was able to use up the two sausages I had roaming about the freezer and a package of ground turkey meat. We ate our meatloaf in the yard with some potato wedges. The kids always dip meatloaf into A-1 sauce.

always.

more meatloaf!

traditional meatloaf
blue cheese and cherry meatloaf (sounds weird, but it's totally good)

I haven't started reading The Help yet, have you? I ordered it through Amazon, and sent it off with Grandma with strict instructions not to bring it back until July 1 so I could meet a few writing deadlines. She read it in three days, and LOVED it. I'm so looking forward to diving in!

brand new in the GF/CF world: My friend Diane just released her new cookbook, available for download. It's a great price, and a wonderful resource. She is also offering an affiliate program if you'd like to help out with advertising (this is not an affiliate link, btw, just helping to get the word out!).